Spiderfoot is one of my favourite OSINT gathering tools. It automates a huge number of queries that would take a long time to do manually. It comes with a wide range of modules that will conduct automated searches for e-mail addresses, IP addresses, domains, phone numbers, usernames, and other types of data. This post will show you how to install and set up Spiderfoot from scratch, and how to conduct a few basic queries.
Spiderfoot runs in a browser but a little command line setup is needed first. For the rest of the post I’ll assume that you have little or no command line experience. If you want to know more about setting up Python-based OSINT tools in the command line, I recommend having a read through this series of blog posts I wrote earlier this year.
Setting Up
Spiderfoot runs on Linux, Mac OS, and Windows. It uses Python 2.7 which is already pre-installed in Linux and Mac OS but to set it up in Windows you’ll need to do a few other things first.
Windows
Spiderfoot version 2.12 comes as a pre-compiled exe file that you can download here and just click and run. This is an easier way to start Spiderfoot if you’re working in a Windows environment but be aware that later and more up to date versions of Spiderfoot won’t work this way and you’ll have to install Python and Pip for Windows and work from the Github repository to stay updated. If you’re not entirely comfortable with Git, Pip, and the command line, this is the easiest way to start using Spiderfoot in Windows.
MacOS and Linux
The best way to run Spiderfoot and keep it up to date is by using git and cloning the Spiderfoot Github repository as outlined in the instructions below.
First of all check that git is installed on your device, as it isn’t installed on all distros by default. To check if it is or not, type the following in the console:
git --versionIf git is installed, you’ll get a message telling you which version it is. If you’re told that git isn’t present, simply install it as follows:
sudo apt install gitIf you’re using a non-Debian based version of Linux, you’ll need to use your system’s own package manager instead of apt.
If you’re using Mac OS, install brew first (it isn’t installed on Mac OS by default), and then enter the following in the terminal:
brew install gitAnd then you’re done.
Whether you’re on Linux or Mac, the rest of the installation instructions are the same from this point on. In the terminal type:
git clone https://github.com/smicallef/spiderfoot.gitThis will create a directory called “spiderfoot” in your home directory. Move to it by entering the following in the console before moving on to the next step:
cd spiderfootInstalling Pip Requirements
If you’ve tried installing Python scripts from GitHub before, it’s easy to get stuck at this point. Usually the installation guides tell you to enter something like this:
pip install -r requirements.txtWhat this command does is read through a list of Python libraries that are listed in a file called requirements.txt and then try to install them. It sounds easy enough but people frequently run into difficulties and encounter a lot of errors at this point and the packages won’t install. The most common reason for this is that their operating system is using a different version of Python and Pip to the one required by the program. Your system’s default version of Python might be Python 3.6, and so Pip assumes that you want to download packages compatible with that version of Python. This can cause a lot of conflicts and stops your software from working. Some of the most popular Python OSINT tools don’t all run with the same version of Python.
The way to avoid this is by making sure that when you call Pip to install the necessary requirements, you invoke it with the correct version of Python. In the case of Spiderfoot, this is Python version 2.7. If you have a more recent version of Python installed on your system, you might run into error messages. To check the version of Python used by your system, enter the following in the terminal:
python --versionThe console will then tell you which version of Python your system is using by default. If you’re installing Spiderfoot and your version of Python is anything higher than 2.7, you’ll need to do the following:
Move to the spiderfoot directory you created before and then enter the following:
python2.7 -m pip install -r requirements.txtEntering the command this way ensures you launch Python 2.7 and then use the -m flag (for ‘module’) to launch the appropriate version of Pip for this version of Spiderfoot. One Pip has installed the requirements, you’ll be ready to go.
Launching Spiderfoot
After completing the installation, you’ll be ready to start Spiderfoot for the first time. If using the command line fills you with anxiety and dread, don’t worry, it’s all GUI after this…
Linux and MacOS
From inside the Spiderfoot directory, run the following command in the terminal:
python sf.pyOr if your system uses Python 3.x, make sure you specify Python 2.7 when launching to avoid problems:
python2.7 sf.pyYou’ll see a message in the terminal like this:
Attempting to verify database and update if necessary... Starting web server at http://127.0.0.1:5001 ...************************************************************* Use SpiderFoot by starting your web browser of choice and browse to http://127.0.0.1:5001 *************************************************************[29/Sep/2019:09:31:26] ENGINE Listening for SIGHUP. [29/Sep/2019:09:31:26] ENGINE Listening for SIGTERM. [29/Sep/2019:09:31:26] ENGINE Listening for SIGUSR1. [29/Sep/2019:09:31:26] ENGINE Bus STARTING [29/Sep/2019:09:31:26] ENGINE Serving on http://127.0.0.1:5001 [29/Sep/2019:09:31:26] ENGINE Bus STARTED
I recommend creating an alias for Spiderfoot to make life easier in the future. To do this, open the .bashrc file for editing in the terminal:
sudo nano .bashrcScroll to the end of the text and add the following line:
alias spiderfoot="cd ~/spiderfoot && python2.7 sf.py"Ctrl + X and Y to save and exit. Then restart the terminal for the change to take effect. Now to launch Spiderfoot, all you’ll need to do is type:
spiderfootAnd you’re done!
Windows
Launch sf.exe from inside the Spiderfoot directory
Now open your browser and in the address bar go to the location specified by Spiderfoot: http://127.0.0.1:5001. You’ll notice that Spiderfoot is still working away in the background in the terminal. You’ll need to keep the terminal open as Spiderfoot runs but you can just minimise the window and leave it in the background.
The Spiderfoot Homepage
In your browser, you’ll see something like this:
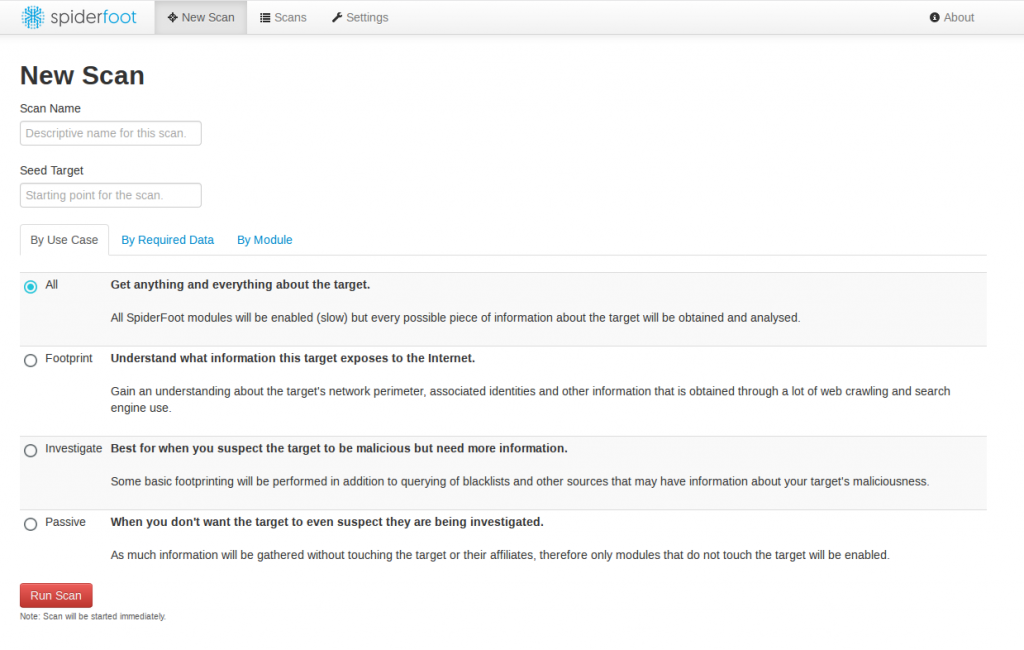
Spiderfoot’s interface is simple intuitive. The top menu lets you choose a new scan (as pictured above), view the results of your previous scans, or tweak the settings. You’ll see that Spiderfoot offers four different levels of scan, depending on your use case.
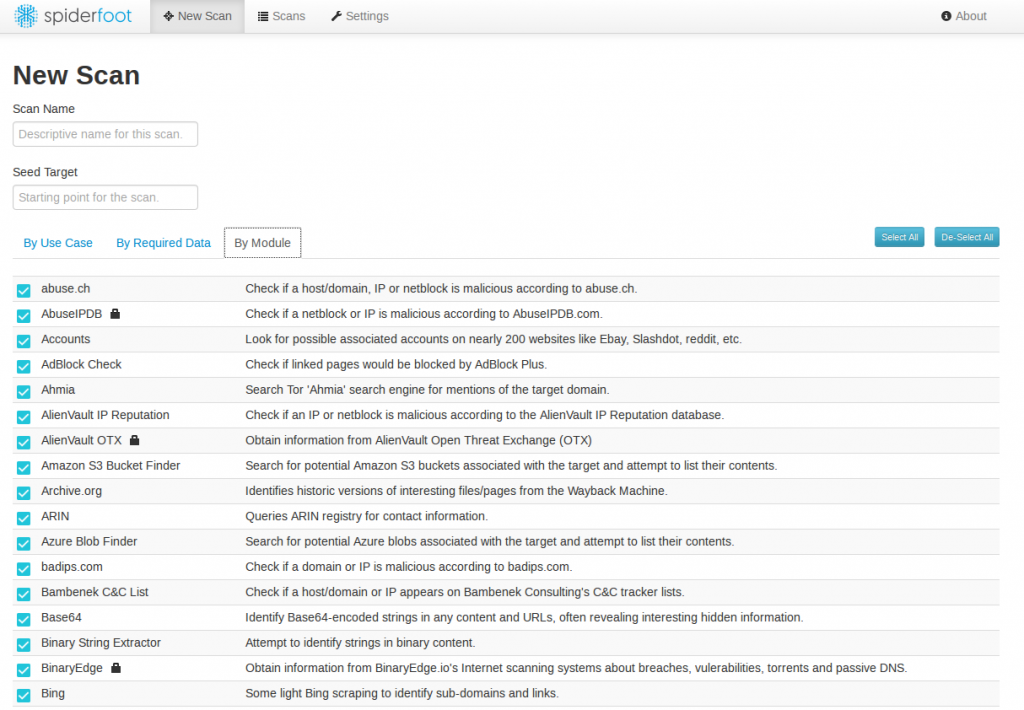
The “By Module” tab allows you to conduct a scan with only selected specific modules enabled. Unless you’re confident about what each module does, it’s best to leave them all enabled by default. You’ll notice that some modules have a padlock symbol next to them – this indicates that the module requires an API key to function. API keys need to be acquired directly from the service provider. Some services provide API keys for free when you sign up, but most require some kind of payment.
As with Recon-NG and similar scanning services, the best results are usually obtained from paid for services that offer API keys, but Spiderfoot has so many modules and is so thorough that it’s still very effective even if you don’t have access to a lot of API keys.
To add an API key, simply go to the Settings page, find the tab for the relevant module, and paste your API key into the relevant field:
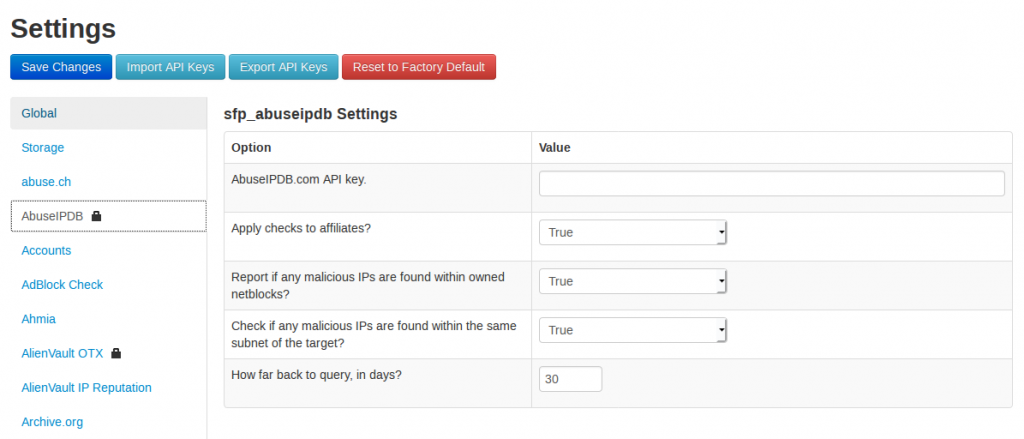
Click on “Save Changes” and you’re done.
Example 1 – Gathering OSINT On An IP Address
For the first example I’m going to show how Spiderfoot can gather information about an IP address. I’ve chosen a live example (at the time of writing) of a problem IP address. IP address 149.202.204.88 has been causing problems for one of my servers and the firewall rules have now caused it to be permanently banned. What can we learn about it from Spiderfoot?
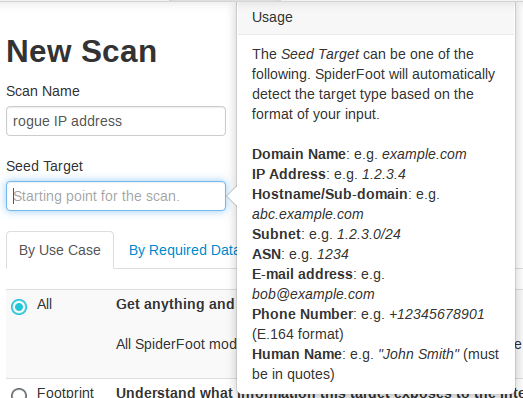
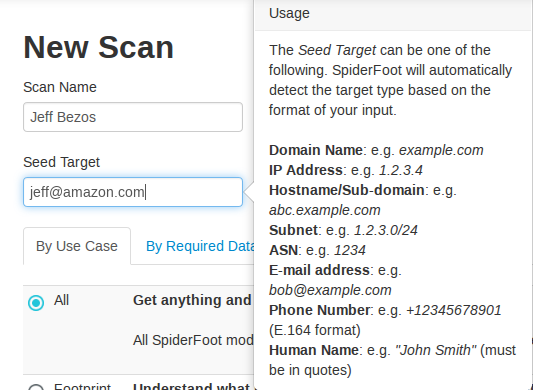
I’m going to start a new scan called “rogue IP address”. The seed target is the piece of information Spiderfoot will be searching for. As you can see, you can search on domain names, hostnames, e-mail addresses, phone numbers, and human names too.
For this search I’ve chosen “all” and I’ve left all the modules enabled. Click “run scan” once you’re ready to start. The amount of time it takes to complete a search varies a great deal. It really depends on just how much information there is out there about your target.
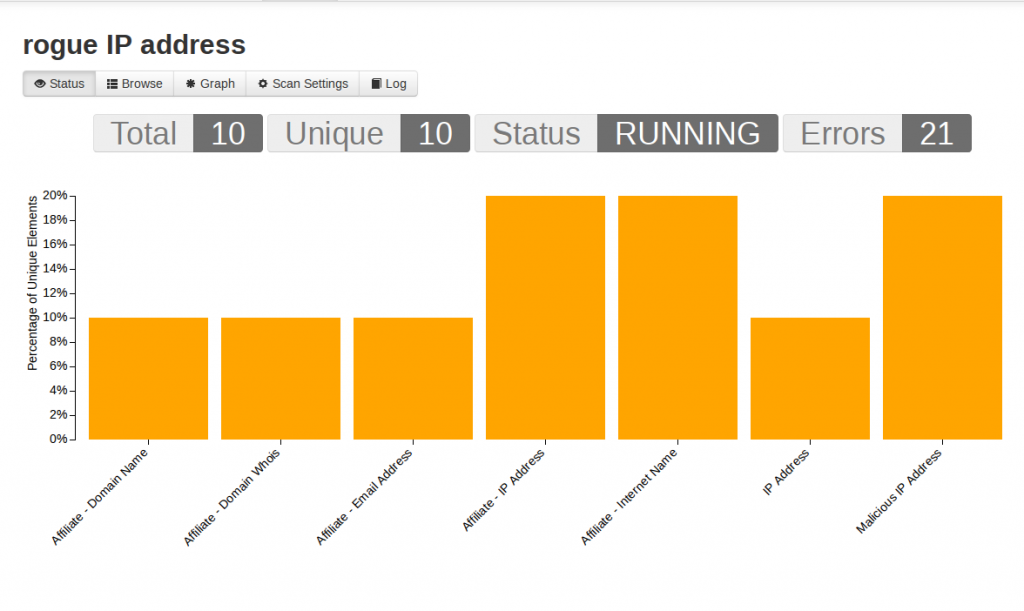
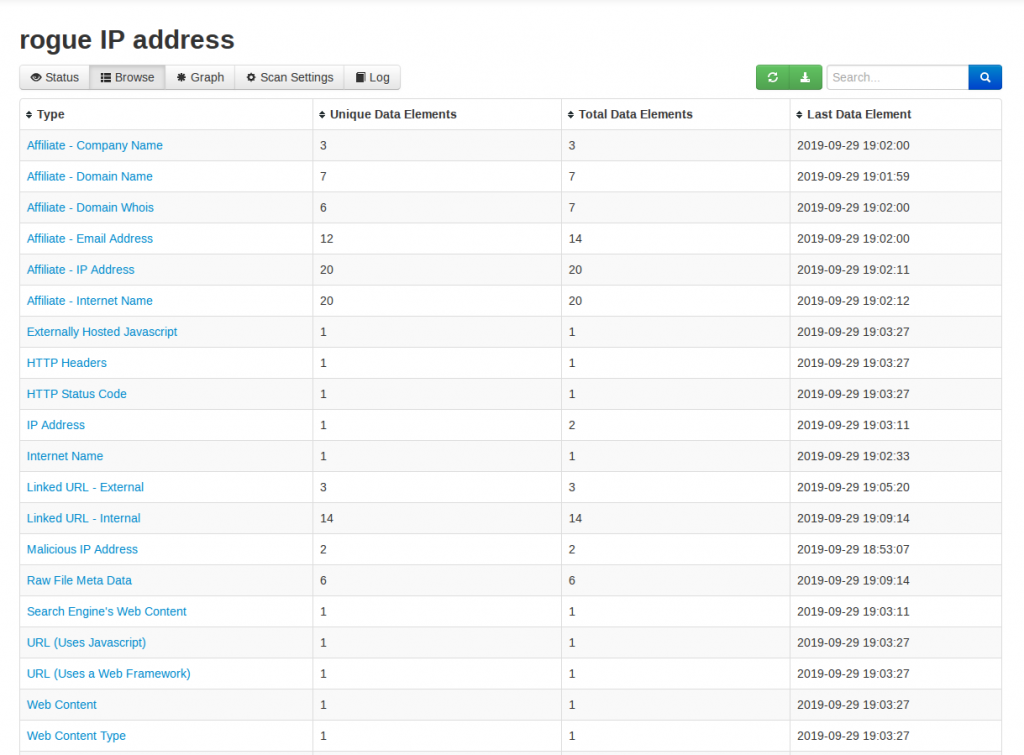
You don’t have to wait for a scan to finish before you can start to look at the results. Spiderfoot sorts them by type so you can begin to get an idea of the type of information that is coming back. To see your results, click on the “Browse” tab:
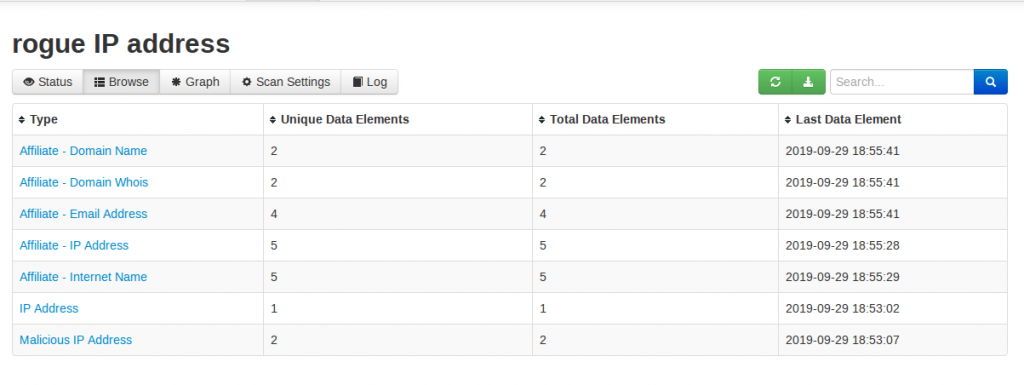
Spiderfoot has already found lots of information for me to work with: Whois results, domains associated to the IP address, and also the fact that the IP address I’m learning about has been flagged as malicious by at least two other services. Clicking on the “Malicious IP Address” result set shows me this:
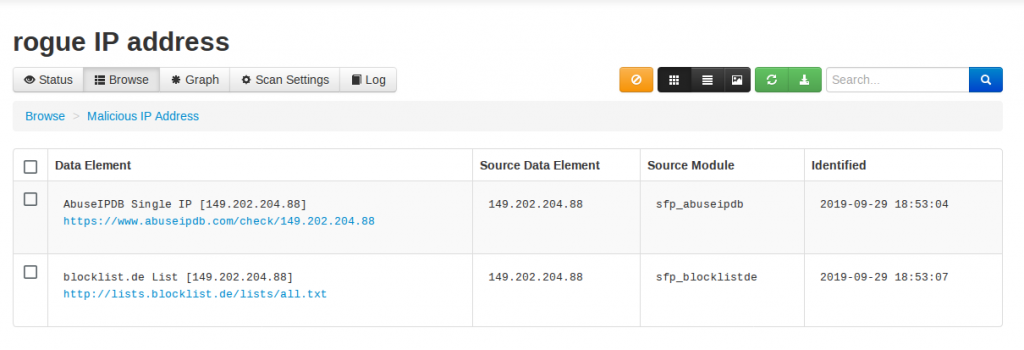
Both blocklist.de and AbuseIPDB have found matches for the IP address that has been causing me grief. Clicking on the AbuseIPDB link gives more information:
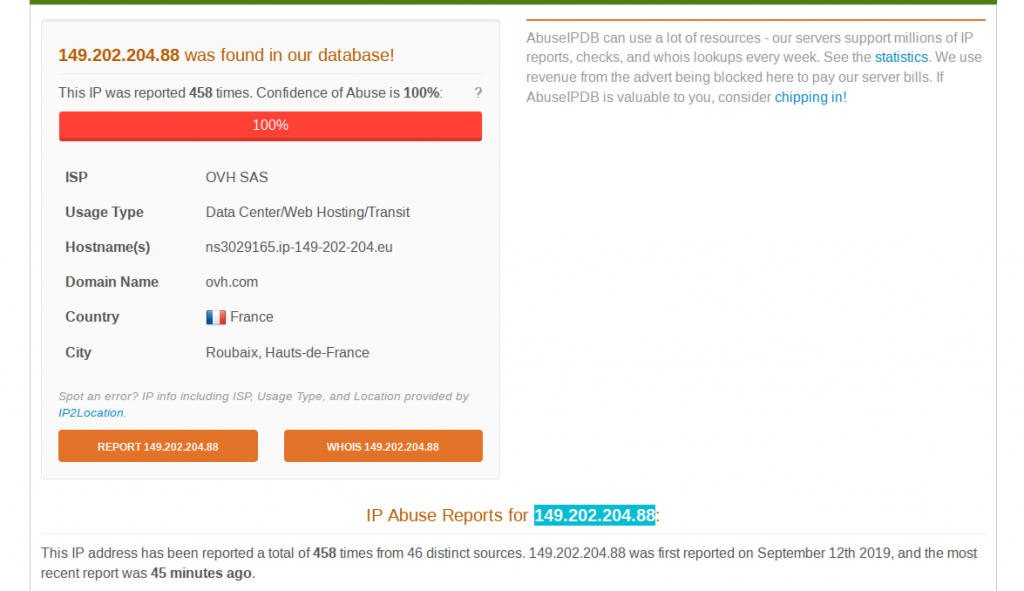
It seems that hundreds of other webservers have been plagued by attacks from the same IP address. This is useful to know – it reassures me that my firewall rules are set up and working correctly, and that this result from Spiderfoot is not a false positive.
After a few more minutes, Spiderfoot has found even more information:
As with all search results there are a few false positives in there too, but in about fifteen minutes Spiderfoot has gathered information that would have taken me hours and hours if I were to check for it all manually.
Example 2 – Researching An E-mail Address
I mentioned Spiderfoot in my recent post on e-mail research techniques, but there’s chance to go into a little more detail here. Just for an example, I’ll search for Jeff Bezos’ e-mail address and see what Spiderfoot pulls back.
The results will be slightly artificial for this search – someone like Jeff Bezos will have his name and e-mail address all over the internet. Real-world OSINT targets are likely to have a much smaller footprint. Part of the difficulty of writing these kind of posts is trying to use real-world examples without doxing some innocent person along the way! As you can see below, Spiderfoot finds a lot of information very quickly:
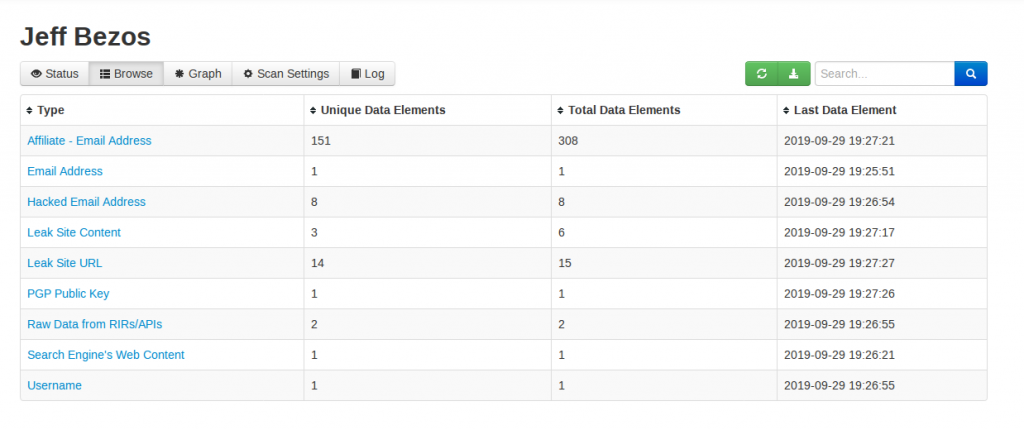
Spiderfoot brings back hits for associated usernames, data breaches, PGP keys, even websites where the target e-mail address is contained within the page source code. As always check everything and be mindful of the possibility of false positives.
The real strength of Spiderfoot is that by rapid automation of OSINT queries it brings back large amounts of useful data in a fraction of the time that it would take to do the same searches manually, leaving you a lot more time to focus on the analysis and reporting aspect of your OSINT enquiries.
For updates on Spiderfoot follow its creator Steve Micallef on Twitter @binaryfoot
so no browser for linux? ok then
There is a browser for Linux?
I’m new to OSINT, and relatively new to Python. These look like great instructions, but I’m struggling with errors as I work through them. When I run “python2.7 -m pip install -r requirements.txt” I get “ERROR: Could not find a version that satisfies the requirement dnspython=2.2.0 (from -r requirements.txt (line 2)) (from versions: 1.11.0, 1.11.1, 1.12.0, 1.13.0, 1.14.0, 1.15.0, 1.16.0)
ERROR: No matching distribution found for dnspython=2.2.0 (from -r requirements.txt (line 2))”
I’ve confirmed that I’m in Python 2.7.18 and I’m in the spiderfoot directory.
I’d be grateful for any suggestions. Thank you.
My apologies, some aspects of this guide are now out of date. Python 2.7 is no longer supported so I need to update this tutorial.
You should now use Python 3+. Check which version your system has installed by typing python -V in the console and it should tell you what version it is. You should be able to run the commands as above but replace python2.7 with python or python3, depending on what you have installed on your system.
Thank you NIXINTEL. I stuck with 2.7, thinking the code wouldn’t work otherwise. I’ve got 3.9. I’ll try it again. Much appreciated.
hi,
i tried to install spiderfoot on a windows pc with GIT. I cannot proceed because i have a recent version of phyton and i tried teh steps told in this tutorial but its not working.
$ install python2.7 but it says install: missing destination file operand after ‘python2.7’ , try –help for more information. What do i do wrong??
This tutorial is slightly out of date now because Python 2.7 is deprecated, you should now use Python 3+. Check which version your system has installed by typing python -V in the console and it should tell you what version it is. You should be able to run the commands as above but replace python2.7 with python or python3, depending on what you have installed on your system.
I’m also a fan of Spiderfoot. I understand it’s been acquired by another company. I hope it continues to be a great standalone product and doesn’t get rolled up into a really expensive suite of products.
bonjour comment puis vous contacter mon email est [email protected] je suis en plein etude sur spiderfoot, sherlock et anola il semble avoir des point similaire je voulais plus approndir